Showing posts with label Grandma's Recipe. Show all posts

Thursday, October 28, 2010

Banana Bread, Muffins & Heart Filled Bundt's


OK, I have a confession to make, when I said I was going to share "My" Famous Banana Bread Recipe, I fibbed a little, it's actually not my recipe, it's my Mother-in-law's recipe. I believe in giving credit where credit is due and I owe her all my credit. I've only made it famous in Alaska amongst my family and friends by serving it at almost every holiday celebration, neighborhood party, school function and holiday gift exchange. It's one of my most requested items that I've made around the holidays each and every year.


In 1987 when my husband and I took jobs in Anchorage Alaska, we up rooted our family and moved away from everything and everyone we had known.  Leaving behind our family and friends just before Christmas made it one of our most difficult holidays ever. In order to try and make my husband and son's feel a sense of home, I called my Mother-in-law back in Minnesota and asked her for her Banana Bread recipe, it's one of my husbands favorites. Knowing that my family loved and missed their Grandma, her cooking, baking and Sunday dinners. I figured it was something I could do to bring a little bit of home to our new life in Alaska.

This is one of those recipes that will fill your heart with joy, bring back wonderful memories, and comfort you in times when your missing your family. It will help create family traditions for years to come as you enjoy making this bread for or with your family members. Over the years I have learned how to perfect my ability to make the best banana bread ever for my husband (we all know a wife can "never" compete with their Mother-in-laws cooking....Right Mom... : ) ...lol... but we sure can try...lol). In doing so, I've created so many wonderful memories for my family and friends.  I hope you will to!

Over the years through trial and error, I've made a couple changes to the recipe, not that it wasn't perfect before...lol.  But... you know me... I can never leave things alone. One, I added more banana's to make the bread more moist, dense and come out perfect every time. Two, I've found different ways to utilize the recipe by making them into smaller loaves, muffins, and heart shaped gifts of love to share with my family and friends.  

My kids love the mini loves and muffins best, they ate them in the morning, afternoon and night, they even took them to school and bartered with their friends.There's nothing better then when your kids friends tell you how much they love your baking. I've even had some of their mothers call for the recipe, saying that I ruined their kids... "Now all they want is your banana bread."  I tell them "I'm sorry" with a huge smile, and offer to email them the recipe...lol

I've learned over the years to double or triple my batches so we have extras in the freezer at all times. It freezes well, ships well and gifts well. It can be served as a brunch appetizer, as a snack, compliment any meal or be a meal in it's self. I always make a fresh batch the minute I have overripe bananas, you never know when you'll need a quick loaf. They also make very cute gifts that everyone loves to receive.

It makes me beam to see others smile and enjoy my baking, to feed them a little bit of my love. Every loaf is made from my heart, blessed by my energy. It give me so much joy to make others feel good. I want to thank my Mother-in-law for her wonderful recipe and gift of love, every time I make a batch I think of her.


Judy's Banana Bread
2 Large Loves
Ingredients:
Sour Milk: Mix 4 teaspoons of Baking Soda and 6 Tablespoons of Whole Milk in a small bowl. Stir and Set a side and let rest.


1 Cup Crisco Shorting (1 stick)
4 Large Eggs
2 Cups Sugar
4 Cups of Flour
9 medium Bananas pealed and blended in a blender. You should have a full pitcher of blended bananas.


In an extra large bowl mix Shorting, Sugar, and Eggs together until well blended and smooth.


Add 1 Cup of Flour to mixture and mix in. 


Pour Sour Milk into Mixture and mix. Be sure to stir well before pouring into mixture.


Add 1/3rd of blended bananas into mixture, mix.

Add another cup of Flour to mixture, mix

Add 1/3rd of blended bananas into mixture, mix.

Add another cup of Flour to mixture, mix.
Add last 1/3rd of blended bananas into mixture, mix.


Add last cup of Flour to mixture, mix. 


Prep your pans whichever your using. When I double or triple my batch, I make several different kinds of breads. I like to make two pans of muffins, two pans of mini loves, and two bundt pans as shown below. You can use regular bread pans or which ever pans you prefer. Spray your pans with a non-stick spray. I use a natural spray, but Pam works well. I've tried to butter my pans, but they tend to burn quicker so I've given up on that method for my banana breads.

Baking Directions:
Bake large loaves @ 350' for 1 hour for two loaves of breads. (start checking at 50min. to prevent burning)
If your making muffins,  fill cups 1/2 full, I use a large cookie scoop, and put one scoop per cup,  and bake for 20 minutes. (being careful not to over bake or they will be dry...not so good.)


If you make bundt pans banana breads, fill pan 1/2 full and bake for 40 minutes, watching to make sure you don't burn your breads. 

If you double the recipe, you can make 2 muffin pans, 2 mini loves pans and 1 heart bundt cake pan.
When I triple the recipe, I can make an additional bundt cake pan.

Once your bread, muffins, or bundt breads are finished baking take out let cool about 15 minutes in the pan then promptly remove from baking pan and allow to cool on a rack. If no rack is available, placing on wax paper works just as well. Be careful not to burn yourself when removing breads from the pan... again, speaking from experience...lol. I use a thin metal spatula to assist and guide breads out of pans and to separate and loosen bread from the pan.


Tips:
1. Follow the steps one by one. By mixing each ingredient as they are listed above allows your bread to take on a different dimension of denseness. When I've added all the ingredients together at the same time, my bread doesn't come out the same. By doing it this way it allows the bananas to be layered into the mixture.
2. To add a variety to your bread, you can add 1 cup of fresh or frozen blue berries per recipe, or a family favorite is adding 1 cup of milk chocolate chips. 
3. It's very important to keep track of the number of Cups of flour you're adding. How I keep track is when I take my first cup of flour, I use my knife and make a 3 in the flour so I don't lose count. with each cup taken, I reduce the number so not to mess up. Or you can keep track with a note pad and pencil or put each cup of flour in separate bowls so you'll know exactly how much flour you have left. Do what ever works best for you. I have on occasion miss counted and  ended up forgetting a cup or adding a cup. If that happens, you can add more bananas if you need to. If you forgot a cup... well... it's really going to be a moist bread...sometimes it wont completely set up... so it's important to keep correct count....speaking from experience....lol... It gets especially tricky when your making a double or triple batch.
4. I prefer to use Pampered Chef stoneware pans for my muffins, breads and mini breads but you can use which ever works best or that you have on hand, but be sure to watch to make sure your bread isn't getting too dark, if it starts to get to brown, quickly remove. Metal pans have a tendency to get darker much quicker, which is why I no loner use them except for my bundt pans which are Nordic ware bundt brand bake ware.  Pampered Chef    
5. If your using multiple different kinds of pans such as glass, metal, stone aluminum etc... it's important to bake  "like kind" of pans together such as if your using stoneware and Nordic Ware, I would bake the stone ware first and then the Nordic ware... when you bake with different kinds of products, your baking will be uneven. The stoneware gets much hotter and will make your aluminum pan product burn much quicker. I baked one of my stoneware mini loaves pans with my Nordic ware and a glass bread pan. My glass bread pan became extremely dark and burnt on the corner that was closest to the stone pan. I've tried a couple different scenarios, and had the same issues which made me come to the conclusion to bake them separate.
6. All of my hints are from errors I've made or things I've learned along my journey. If you have any questions, or if you find my teaching method confusing, please send me a note so I can clarify.  This recipe is actually very easy if you take it each step by step. The rewards will be well worth your efforts, I promise!
7. When freezing your breads, I prefer to use Reynolds Heavy Duty Tin Foil for all breads large or small. I store the muffins in a freezer Ziploc and take out what I need and let thaw on a plate. You can  re-warm your bread right in the tin foil wrap if you prefer warm fresh banana bread. Serve with butter....yummy! I hope you'll create a new tradition with your friends and family and enjoy some homemade love. Until next time....
~With much Love~
Chel Marie


Tuesday, October 19, 2010

OUR FAMILIES FAVORITE PANCAKE RECIPE'S Buttermilk & Blueberry Banana Pancakes


We have two favorites in our family;  Our Grandmothers homemade recipe that has been handed down from generation to generation which is made with Buttermilk, and Yellow Cornmeal, two ingredients I never really cared for in pancakes; that is until I had Grandma Q's pancakes. They are fantastic, thin and go down very easy. These are the kind where you'll lose count as your eating them and not care because they taste so good.

GRANDMA Q'S OLD FASHIONED PANCAKES

Mix Together:
1 cup Flour
2 Tbsp. Oil
1 Tbsp. Sugar
3/4 tsp. Baking Soda
A handful of Yellow Cornmeal (about 1/4 cup)
2 cups Buttermilk
A dash of Salt
2 Eggs

Wisk to a smooth consistency. Pour onto a hot griddle in silver dollar sized pancakes. They cook quite fast, almost like a crape but a little thicker. I usually double this recipe because they disappear so quickly. Serve with butter and your favorite syrup. My Grandma preferred Karo Syrup, it's is a lighter syrup, not as heavy as maple syrup. Either way, they will melt in your mouth.

 
Family favorite number two is your traditional American quick recipe…Yes, OK, I'll admit it…it’s Bisquick with a twist. I’ve tried others, but we keep going back to our old faithful. Most people who taste my pancakes think they are some complex fancy recipe. When I tell them it's Bisquick, they can't believe it.  It’s quick, easy, and doctored up can taste just like homemade...even better.  Topped with my rich Sautéed Banana topping, it’s more like a dessert than it is for breakfast. Every bite is filled with a creamy caramelized banana.

I prefer the caramelized bananas instead of syrup but some of my family members disagrees, they prefer butter and syrup or my husband’s favorite is caramelized blueberries.  Everyone has their own taste and if you’re like me, depending on whose home; I normally end up making two choices.

BLUEBERRY BANANA PANCAKES


Melt in your Mouth Pancakes 
       
Depending on the size of your pancakes, I can usually get about 14 medium sized cakes. 4 per pan.
1.       Mix together:
2 Cups of Bisquick Mix
1 Cup of milk (we use whole milk)
2 Eggs
1 Tbsp. Sugar
1 tsp baking powder
1 Tbsp. lemon juice (fresh squeezed is best)
1 Tbsp. Vanilla (I prefer Madagascar or Mexican real Vanilla)
Stir ingredients until blended.
2.       Pour slightly less than ¼ cupfuls onto a hot greased griddle.
(I use Pam Natural lightly sprayed once in the beginning)
3.       I then quickly place fresh or frozen (thawed and drained) blueberries on top of batter. You can mix two cups of blueberries into the batter, but I prefer to place them on top of the batter, it makes the blueberries plump up with flavor, and makes your pancake more mouthwatering and allows your pancake to cook all the way through.
4.       Cook until edges are dry, and pancake is filled with air bubbles on top of pancake. Flip and cook until golden brown.
For thinner pancakes, you can add a little milk to thin the batter, but with the blueberries, it works better with the thicker batter.
While the Pancakes are cooking I start sauteing the banana's (or blueberries).  I thought I took a picture of this step, but can't find it anywhere... I'll post one soon, I promise.

Sautéed Banana Filling
4 tablespoons butter (I prefer Land O Lakes regular)
1/2 cup firmly packed light brown sugar
6-8 large bananas -- peeled and sliced about 1/4-inch thick

Make the sautéed banana filling:

In a large heavy skillet, over low heat, combine the butter and brown sugar, stirring to combine. When heated through, add the bananas and sauté gently, stirring occasionally until evenly golden, about 5 minutes. Let cool slightly.
You can use Fresh Blueberries instead of the bananas (My husbands favorite). For today, I've served it with butter and syrup, and with warm irresistible mouthwatering caramelized bananas. Enjoy!


If you prefer just banana's, you can add the banana topping right to your batter just as I did with the blueberries above. It makes a very dense cake like pancake filled with luscious silky bananas, top with syrup and enjoy. I was inspired to make this pancake by a restaurant in Hawaii. One night while in Honolulu on a lay over while waiting for our doggies to arrive from Alaska, we went out for dinner at a restaurant a couple blocks down from our hotel. It was the only restaurant open. The menu was limited, serving old fashioned home-style cooking. My son ordered the Banana Pancakes. 
When the server asked him if he wanted the short stack, explaining that it was a large order of pancakes...forewarning him. He chuckled, remembering the sourdough pancakes from Alaska and how big they were. He was certain that he could polish off a large order... 
"No...I'll take the full order." He told the server... 
She laughed, "OK... but I warned you..." she giggled as she walked to the kitchen. Several minutes later, she brought out my and my husbands dinners, telling us shed be right back, "the plate is too heavy to carry with  the other plates..." she commented.  Now we were giggling... thinking... We just came from the home of the sourdough pancake...where it filled the entire plate.  A full stack was two, they were always dense and very filling. We had no idea that the Hawaiian version was more like a cake than a pancake... it gave a new meaning to the word pancake...lol.

     "I told you so!" our server said with a beaming huge smile. "If you eat it all, your dinner is on us." She said.
My son tried his hardest to eat as much as he could, but it was so much. My husband and I both nibbled after eating our meals, it was a wonderful dessert. We took the rest back to the hotel and ate it for breakfast...all three of us.

Here is my smaller version.
ENJOY!


Tuesday, October 5, 2010

Grandma's Apple Pie Bars


This is one of my favorite treats my Grandma use to make. I've never been able to make it quite like she did until last week when I finally figured out her secret... Fresh from the tree apples of different varieties.... it was just like I remembered ♥ She use to pick the apples from our tree and our neighbors apple trees right before making the pie. I forgot that important detail. I remembered as I took my first bite. The flavor from the different apples blended to a perfect blend of sweet and tart. I also remembered how she kept the apples from turning brown before the pealing process was complete... I'll share my secrets in the pictures below. This is one of those childhood memories you hang on to and pass along to your family. I guarantee if you make this recipe, you will be the hit of any occasion. It's great anytime of the year, but best when the apples come straight from the tree... Thank you Grandma, I love and miss you♥

Apple Pie Bars
Bake 1 hour or until done @ 350 degrees
Ingredients:
14-20 Apples, different varieties if possible
1 Tablespoon of Lemon Juice
2 Heaping Tablespoon sugar
2 tsp. Salt
2 C. Shorting (I use the Crisco Sticks, no mess & easy to measure)
2 egg yolks separated into a measure cup and add enough milk to make 1 1/3rd C.
(Keep whites for topping on crust)
2 C. Crushed Toasted Honey and Oats (Corn Flakes or any other flake cereal will work as well)
2 C. Sugar
2 teaspoons of Cinnamon
2 C. Powdered Sugars
Pie Crust
5 C. Flour
2 Heaping Tablespoon sugar
2 tsp. Salt
2 C. Shorting
Mix like you would any pie crust (I find using my hands work best, just like my Grandma did).
Put 2 egg yolks into a measure cup and add enough milk to make 1 1/3rd C.
Liquid, break up yolk with a fork, and beat in cup before adding to crust mixture.
Mix crust until dough is formed. Divide crust into two balls. Wrap each ball in saran wrap and shape into a disk or hockey puck shape. Refrigerate while you get your apples done.
Peal 14 large apples, or 20 smaller apples, depending on the size. I use fresh off the tree if I can, but the ones you get from the store taste almost as good.
I like to peal the skins off, core the apple by cutting the apple into 4’s, then I sliver the apple into same size wedges about and 1/8th think so apples bake evenly.

Side note: An apple-peeler-corer-slicer gadget works great for larger apples, not so great for small or odd shaped apples. I remember when I found my grandma’s gadget; I just had to use it, curious as to how it could do everything all at once. Grandma preferred the hands-on method. So we’d race to see whose method worked best. She always won, and her apples were perfectly sliced. I didn’t care; I just enjoyed using the toy like device. Plus I use to play with the long strings of skin after, or we’d put them in a pot of water and boil them making the house smell all warm adding a cinnamon stick for the Christmas like smell.
As I peal the apples I place the sliced apples into a large bowl that I always use knowing just about how many I need to make a perfect pie. The great thing about this recipe is that if you’re an apple or two short it won’t matter. Because it’s a bar, it will still come out perfect no matter how many apples you add. For a thicker pie, I add more apples making it more like a huge pie for larger crowds instead of a bar.
After pealing a couple apples, I add a cup of sugar to the bowl and keep the apples coated, along with a tablespoon of Lemon Juice. This will keep your apples from turning brown. Every time I add another apple, I just give the mix a quick stir to make sure every sliced is coated. After I get all the apples pealed, I put the bowl aside and start on rolling out the dough for your crust.

After pealing a couple apples, I add a cup of sugar to the bowl and keep the apples coated, along with a tablespoon of Lemon Juice. This will keep your apples from turning brown. Every time I add another apple, I just give the mix a quick stir to make sure every sliced is coated. After I get all the apples pealed, I put the bowl aside and start on rolling out the dough for your crust.

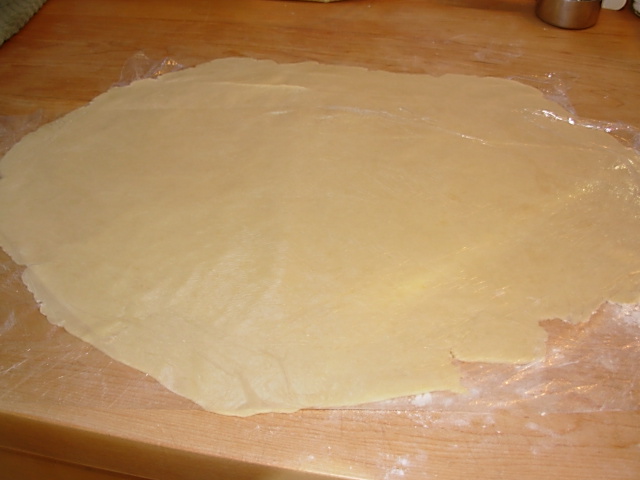
Now for rolling out the crust, there are a couple different ways you can go about this. Because the pie crust needs to cover an entire jelly roll baking pan, you will need to make your pie crust a lot bigger to cover the corners. My Grandma was a pro at rolling out dough, she could always make the crust perfectly fit the pan, and be a consistent thickness throughout. I don’t make as many pies, and haven’t perfected that skill yet. So I use a technique I learned watching Martha Stewart. Take a large piece of Saran wrap larger than the size of the pan. Sprinkle some flour on the plastic wrap; take your dough from the fridge pat some flour on both sides place your dough down in the center. Take a second strip of wrap equal size and lay over the dough. Take your rolling pin and gently start pushing your dough down to make a thick pancake. Once you have pushed down enough, you can start rolling it out, you will need to start pushing a little firmer on your rolling pin to get the dough rolled out further to the size of your pan, be patient, it will get there. 


You can easily measure by placing your pan on top to make sure your rolled dough is big enough. It works like a charm, making a perfect pie crust every time. I’ve never had an issue making my crust this way, no tears, breaks or rips....well OK, maybe a few imperfections... but normally it comes out perfectly each time. it will get easier with each crust you make. Then Perfection! It’s one of the best tips I’ve learned from Martha’s Kitchen show.

Once your crust is rolled out and you’re ready to put it in your pan, it’s much easier if you slide the crust, plastic and all onto a large cutting board or the back of a second pan or flat cookie sheet.  Take the top plastic wrap off, place your pan face down over your crust perfectly centered. Then quickly flip your two pans over together, peal the wrap off the bottom crust, and Walla… you have perfectly placed your crust without tears… But don’t worry if you do get a crack, tear, or thinned spot, you can always fix it with the extra crust you’re going to be cutting off your trim. I know this sounds harder than it really is. Once you’ve done it once, you’ll see how easy it really is. Now, if you’re making pie crusts like a pro….If you are a pro,  you can skip the above step and use the traditional pie making technique your comfortable with and fill your pan.

Once your corners are secured in your pan you can begin to shape it by gently pushing the dough down filling in each corner, and then fill in the edges of the pan….. I use another small roller to make things even. But your hands or fingers will work just as well. Those old play dough making skills come in handy.
Leave the edges for now, you’ll make them pretty once your top crust is placed. If you have abundance in one area, you can trim to make your edge even around the entire pie. Sprinkle the two cups of crushed corn flakes evenly over the crust. This will help to stabilize your dough, and create an even flakier crust. Do not eliminate this step, if you don’t have flakes, use some other plain cereal. Even raisin brand will work; just take the raisins out…. Or not.

Now take your apples and evenly spread in the pie crust. Your apples should have developed a lot of juice, I strain the apples with a slotted spoon so not to add to much of the juice in your pie crust… you don’t want your crust to get to soggy from all the extra juice. Once the apples are in place, I take the remaining cup of sugar and mix it with the cinnamon. Sprinkle over the top of the sliced apples.
Now roll out your top crust the same way you rolled out the bottom. Once rolled, I take the top plastic off the crust layer I gently slide the crust onto a cookie sheet with the bottom wrap still on for easy handling.
Line both pans up and flip the crust off the cookie sheet trying to center as best as you can. Once in place, you can roll the bottom crust edges with the top crust or pinch them together, and then use a fork to gently press down creating a nice seal and perfect crust edge. If there is too much dough you can trim some off. If the top crust tore or ripped you can re-roll the extras scraps and tap it over the torn area gently pushing it into dough to make a patch and blending the two layers. Grandma used a little water around the edge to secure the patch and bind the dough pieces together.

Once done, take the two egg whites that you have put a side from earlier and whip them up with a mixer until they are stiff. Spread evenly over the top of the crust with a pastry brush. Use a fork to poke venting holes in top pie dough; I make about 8 stabs, 4 on each side.
Be sure to line the bottom of your oven with tin foil so any extra juices that may boil over are caught and you don't have a huge sticky mess to clean.
Bake 1 hour or until done, making sure the crust is a golden brown, and your apples are tender, I use a cake tester to make sure my apples aren't hard.
Remove pie from the oven and pour glaze over hot pie.
Glaze 
Add enough water to 2 cups of powder sugar so make the glaze thin enough to drizzle over the hot bars. I use a large spoon and create a design of crisscrossing back and forth to cover the crust evenly as shown below.
Let cool, you can sever warm or let cool completely, I like it both ways, but prefer it cold best. Bars can be stored in or out of the fridge, but don’t expect them to last long. Don’t be surprised if they disappear overnight. I could never keep them in the house; my boys would devour the entire pan which is why I always doubled the recipe and made two pans at the same time when I had a house full. That way you can take one pan to share.  Bring copies of the recipe though, everyone will be asking you for it.
Enjoy