My Auntie's Homemade Beef Stew
I love you Aunt Marlene

3 pounds of Stew Meat
4 cups of Flour,
1 Tablespoon of Salt,
1 Tablespoon of Pepper
Sake above ingredients in a large plastic bag until the beef is well coated.
Heat
large frying pan on the stove, once heated, add enough vegetable oil to
cover bottom of pan, heat a minute or two... then add a single layer
of flour coated beef in pan... Brown all sides.
Once nicely browned remove meat onto a several layers of paper towel to drain excess oil from meat.
While
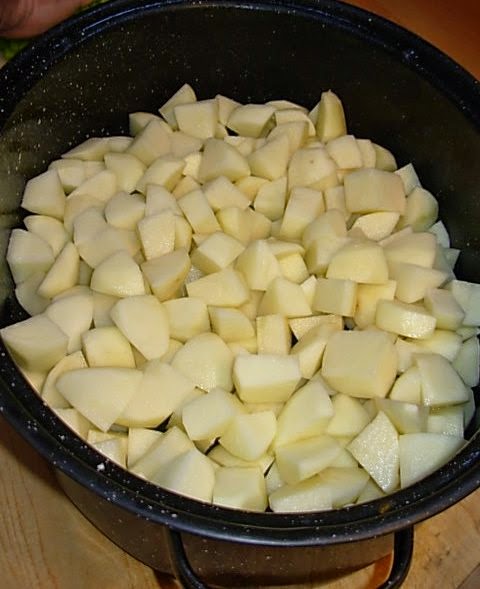
Meat if frying... I peal and cut up in 1" chunks 10 large carrots, 10
large Russet pealed Baking Potatoes, 1 large stalk of Celery (about 10
sticks), and 1 Large Sweet Onion.
Spray Pam in a large Roaster pan covering all areas, even the rim of the lid... (you'll thank me later... )
Place all ingredients into a large Roaster. (I prefer the old-fashioned Black with white specks one. You can also use a dutch oven... The above measurements are for the large roaster.)
Add enough water to cover meat and veggies (about 12 cups). Cover with lid and put into a
350* degree oven for about 3 to 4 hours.
When
done add 2 cups of frozen peas. I hate mushy peas which is why I add
them last... they will thaw while your stew is resting a minute before
serving.
Stew is done when the stew begins to brown and when you stir the stew it will thicken up from the soft carrots and potato's... If too watery for your taste... you can always mix a cup of flour and water into a cup and slowly add to the stew to thicken... I rarely have to do this. I usually check the stew every hour until I feel it's done... It should look like the above picture ... Below is a picture step by step... Enjoy!


| ||||||||||||||||||||||||||||||||||||||||||||||||||
Showing posts with label Old Family Recipe. Show all posts
Showing posts with label Old Family Recipe. Show all posts
Wednesday, November 5, 2014
My Auntie's Homemade Beef Stew




Wednesday, November 3, 2010
Snoopy Peanut Butter Rice Krispie’s Bars
These are one my favorites to make all year long,
I never get tired of making them,
eating them, sharing them or did I say…eat them?
I love, love, love them!
so do my boys and anyone else who gets to eat them.
At Christmas when I need a gift or treat quickly, these are it. I’m talking 20 minutes from start to finish. You can eat them warm, but usually I make my kids wait. I’ve tried it with other chocolates, but I always go back to the milk chocolate. I’ve been making these bars for as long as I can remember. We use to get a similar bar at school, called Snoopy Bars, but the texture was slightly different. These are very similar to Rice Crispy treats, same concept but they taste so much better. If you’re a chocolate peanut butter kind of person, these are for you!
Enjoy!

Snoopy Peanut Butter Rice Krispie’s Bars
1 Cup White Sugar
1 Cup Light Corn Syrup (I prefer Karo)
1 ½ Cup Peanut Butter (I prefer Jif Creamy Peanut Butter)
6 Cups Kellogg’s Rice Krispie’s
1 Package of 11.5 oz Milk Chocolate Chips (I prefer Ghirardelli)

Put sugar and light corn syrup in a large sauce pan, bring to a boil stirring constantly being careful not to burn. Once mixture reaches a boil remove from heat.

Add 1 ½ C. Peanut butter stir until melted.


Add 6 cups of Rice Krispie’s.
Mix together until all cereal is completely coated.


Pour into a 13 x 9 x 2-inch cake pan
coated with Pam cooking spray.

Press mixture down evenly in pan.

Sprinkle Chocolate Chips on top.


Put pan in oven at 275 degrees until chips soften, about 5-7 minutes. Quickly remove from oven, spread chocolate evenly around bar.

Let cool and cut in squares.

I like to use a butter knife to loosen up the edges,
and then I pop the completely cooled bars out onto a cutting board.

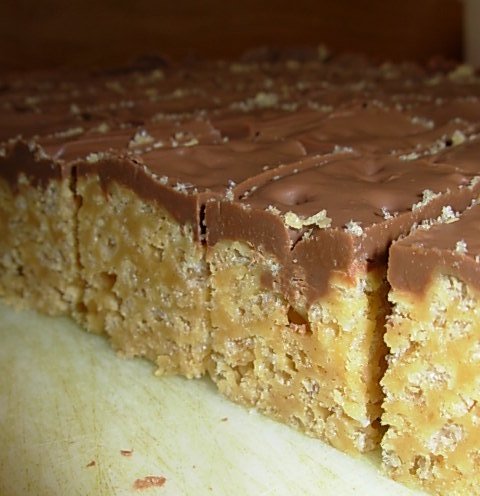
I then flip the bar and cut into small bite sized squares. You can cut into larger bars, but these little gems are very rich so a little goes a long way.

The knife shown in the picture was actually used to cut our frozen Cheese cake. You can get it at any knife store, or order it on line. It’s called a Wusthof Gourmet 12” Cheese Knife, Doubled Handle. By Wüsthof It works perfectly for cutting bars, frozen cakes, or anything you want a nice even straight line, plus it is so much easier to cut with being able to apply pressure evenly from both handles.


I prefer small 1 inch squares;
they are easy to eat, share, and are the perfect nibbler size.
These are one of the easiest treats to make & send
to your loved ones, normally
they won’t break up during travel
to your desired destination,
I've sent these to friends serving over seas
and to my boys for their birthdays.
to your loved ones, normally
they won’t break up during travel
to your desired destination,
I've sent these to friends serving over seas
and to my boys for their birthdays.
It's one of my favorites to mail.

You do have to make sure that if you’re mailing in extreme heat, that you use waxed paper or parchment in between your layers, and freeze before you mail to set the chocolate completely. The tighter you package the bars, the better they’ll travel.


I like to make several pans at Christmas,
everyone loves them,
they make the perfect gift, brunch compliment, or after school snack.
My boys love these bars!
ENJOY!
Subscribe to:
Posts (Atom)